Wednesday, December 24, 2008

Squeezing in a Little Me Time


I have several wood blocks leftover from a workshop and I decided to use up some of my Christmas paper and scrap this years Santa photos! :) Holiday baking and all the cards I just sent postal (the last one yesterday) have kept me VERY busy lately and this little project is all I've finished (kinda) since the month of December came along and body slammed me into reality!!!
I did this little block with
chipboard snowflakes. Covered them with Whisper White Craft Ink and on one added a Fire Square Brad. I covered the block with Holiday Treasures Designer Series Paper, and sanded the edges before I inked them with Close to Cocoa Craft Ink. The finishing touch is a piece of Riding Hood Red 1-1/4" Grosgrain Ribbon tied on. I also stamped "08" on a piece of Riding Hood Red card stock using the Schoolbook Serif Numbers stamp set.
I've actually only added one of the Santa photos so far, the other one is still on my phone for now. Yes I procrastinate, as here I am on Christmas Eve posting on my blog while the last batches of fudge and toffee chill in the refrigerator. I'm scheduled to be at my dad's in 2 hours 15 minutes and counting... :) Merry Christmas!

Sally

Tuesday, December 9, 2008

WOW!

Stampin' Up! has surprised us all with this promotion...
From now until December 23rd we can enjoy FREE shipping on every order over $70. That includes workshops too, so even if your wish list is small, you can get your friends in on the action and place a group order!


RETIRED STAMPS
Every time we introduce a new Idea Book & Catalog they have lots of great new stamps and accessories. One way this is possible is by retiring some of the older items. Well the list of stamps is out and this time with a TWIST. Excluding the hostess sets, EVERYTHING on the list is 10% off through December 23rd. So yet another reason to shop, shop, shop! Click HERE for a list with the reduced prices, and click HERE to shop now!

Saturday, December 6, 2008

Friday's Sketch...on Saturday ;)


I created this sketch last week for posting over on Splitcoast yesterday. I decided it was time for another DPS, and I wanted to do a layout that has a one photo page (a classy look) adjacent from a multiphoto page (my preference). I always have too many photos to scrap!!

I'm trying to make more of an effort to use my sketches each week. I should be able to do ONE page a week, right!? So you can expect to see more posts with sketches here, but as always all of my sketches can be found in the sidebar slideshow on the right>>>.

I had the perfect pictures to fill up the right half of this layout, but not one I was overly excited about for the left. I considered getting an enlargement of one and mixing in other family members...NAH, what do we need them for!? So this is just Natalie showing us her many many expressions. She is so cute if I do say so myself!!! tee hee


It's a pretty simple page. I stamped the background with polka dots down the left side of this textured cardstock. Then added a 6x12 strip of DSP and an 8.5 x 8.5" square piece of cardstock. I decided to add the scalloped border and some punching to give the solid piece a little extra pizzaz. I chalked the heart in "i (heart) u" for a little unexpected color and then went further to add more pink stamping the small chipboard heart and covering the other one with DSP. I also edged the tic tac toe piece with ink after I punched the corners.

Stampin' Up! products
STAMPS: A Happy Heart, Polka Dot (BG stamp)
PAPER:
Chocolate Chip textured, Tempting Turquoise, Whisper White, Bella Rose DSP, Prints Tempting Turquoise DSP
INK (CRAFT):
Tempting Turquoise, Regal Rose, Whisper White
ACCESSORIES:
1" Chocolate ribbon, chipboard hearts, Stampin' Pastels, Curly Label Punch, Corner Rounder Punch, 1/16" hole punch, Scalloped Edge Punch, White Gel Pen

Thursday, December 4, 2008

Scrappy Advice for Getting Started

Occasionally I get an email from a reader and recently I've had two with similar questions. They both asked me about beginning scrapbooking, so here is some advice for getting started.

What Do I Need?

Scrapbooking is a wise investment since you are creating something that will last for many generations, but you really don't need to spend a lot of money to get started. I recommend a good paper trimmer, sharp scissors, and a crafters tool kit to begin with. You'll also need paper and double sided tape, both of which should be archival safe. With these items you can create simple "no-frills" pages, but if you'd like to create something more artistically expressive, you'll want to expand your supplies with a few gadgets and some nice embellishments as well.
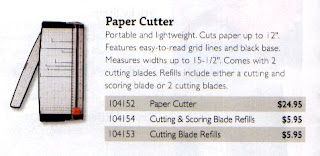

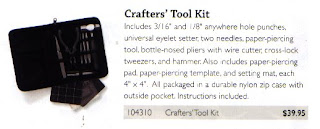
Rubber stamps, and a few ink colors (go for the pigment inks) can add a lot to a scrapbook page. You might also like brads, ribbon, punches, paper flowers...the list can go on and on. Try not to be overwhelmed, buy what you need as you need it to minimize the cost of your new hobby. You could even start with themed "kits" which could make these decisions much easier. Stampin' Up! has a great line of products they call Simply Scrappin' which along with the items pictured above can be purchased through my website.

Believe me, it won't be long before you'll have WAY more consumable supplies than you know what to do with...and you'll wonder how on Earth they've taken over your life!! hee hee

Choose Photos and Color Scheme

Depending on the album size you've chosen, select an appropriate number of photos. Can I get them all on one page or should this be a two page layout? Don't be afraid to trim your photographs and remove excess background. Be conservative, you can always go back and take off more. If you are working with digital photos fix red eye and do most of your cropping BEFORE you print. You can also try printing a few versions of the same photo cropped in different ways. That can be a fun way to use a favorite photo when you don't have additional shots to use with it! Here are two examples of cropping:
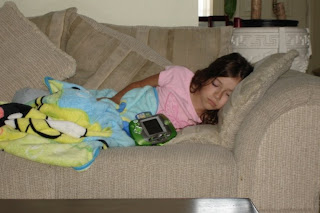
This is my original photo.
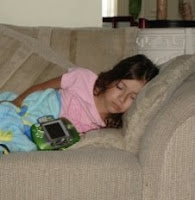
This is how it might look if I simply trimmed some excess and added it to a layout.
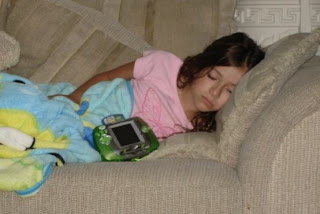
This is the same photo cropped BEFORE printing. If you do this make sure you pay attention to the aspect ratio, I made sure mine was 4x6 and I centered her as much as possible. Notice she is zoomed in closer and you can no longer see the coffee table at the bottom.
It's a better looking version of the original photo, and because I didn't zoom in too close I can still trim more off when I pick up my prints (if I choose to). This would help me squeeze more pictures on a page...which is something I tend to do!

Once all of your photos are cropped to your liking, study them for a similar scheme. Look for similarities in the background colors or the clothing color of the photo's subjects. The best color selection will accent and compliment your photos. To figure out which colors look the best, try laying your photos on a few different colors of card stock. Choose the color that best accents the photograph. Using one color for the background page and another color for matting your photos creates a great looking layout.

Arrange the Layout

Play with the arrangement of your photos until you are pleased with the layout. I like to overlap photos and embellishments sometimes, but I suggest at the very least you keep the photos "clustered" together to enhance the look of your page.You can also follow a sketch, which for some people makes completing pages much easier.

Matting is a simple way to make your photos POP. Matting is done by laying your photos on a piece of card stock 1/8 to ½ inch larger than your photograph. This gives the photos a finished or framed look. For added effect, you can double or triple mats with different colors behind your photos.

Be smart when you cut into patterned paper. Don't toss anything larger than 1/2 an inch. Scraps can make wonderful embellishments that will coordinate with your page. Cover chipboard pieces and use punches...it's just another cost effective way to stretch your supplies!

Choose Embellishments

After selecting and cropping your photos and choosing the background paper, you are ready to select some page decorations. Stamps, die-cuts, punches, brads or eyelets, and paint are all great items to decorate your scrapbook page. Choose embellishments that compliment your photos or the theme of your layout. For instance if your layout consists of birthday pictures, use festive patterned paper or stamp balloons and confetti to make a party theme.

Punches and die-cuts can be purchased in many shapes. I find it a lot of fun to make my own accessories. Try stamping on chipboard, and adding some ribbon and/or hardware. Keep in mind that less is more when using embellishments, the focus should be on your photographs, not on the accessories. Also you should follow "the rule of threes" when possible. Basically place things in odd numbers, 3, 5, 7. It's said to be more visually appealing.
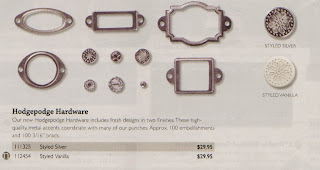
An example of some YUMMY hardware from Stampin' Up!

Don't Forget the Journaling

Journaling is one of the most important parts of a scrapbook. Journaling provides important details about the events or people in your photos. A title is one way to tie the theme of the photos together. When writing about your photos, follow the theme that you chose when you were selecting embellishments.

Add a quote, song lyrics, or the title of the occasion to reflect your page's theme. Add it directly on the page with your rubber stamps or stamp/print your title on coordinating card stock, trim out and attach. Journaling can be handwritten (my preference) or done by using your computer to type it out, just print on acid free paper or card stock.

After giving your page a title, include some information about the people in the photos or details of the events. At the minimum, try to include the name of the person in the photo and the date the photo was taken. Sometimes I limit the date to a month but include the true date on the back of my layout. Once I have several pages for an album that are chronological I don't want them all to include the year....might be a bit redundant.

Arrange the Layout Again and Make it Stick

Before you permanently tape everything down, experiment with the layout. Rearrange the photos and embellishments on the page until you find the best look. I have found myself taking a whole new direction and the end result was a much better page!

Once you are happy with your layout, secure your items to the page. There are several types of adhesives available to scrapbookers including glue, tape, spray adhesive and photo corners. Try using a few different items to see which you like best. Glue sticks work well for die-cuts and other embellishments, securing them firmly to the page. I like my good ole double stick tape!

Put Them Away

I have a little easel on a shelf in my studio and I like to display my pages on it. So when I finish a new layout, I rotate my "new favorite" to the easel. But aside from an easel or a frame, I recommend you keep your finished pages in page protectors ready for an album, or go ahead and put them in an album. Don't stack them on top of each other...additionally you should never store your albums flat, they should be kept upright vertically to prevent bulky embellishments from damaging adjacent pages.

Personally, I like a top loading post bound album. They are easy to rearrange if you need to by just pulling the pages from the protectors and moving them. Since I don't scrap chronologically I have several albums going at the same time. But I wouldn't have it any other way. It allows me to scrap what I'm inspired by at the moment, and since my free time is limited, this is what works best for me!

Friday, November 28, 2008

Pie Stamping

I made my pumpkin pies on Wednesday so I could focus on the feast itself on Thanksgiving. Since I was doing them a day ahead, I decided why not go Martha Stewart and try something "fancy."
I've seen beautiful pies that have the layered leaf border around them, they're so festive, love that! I dug out all my cookie cutters looking for the perfect leaf to use. Hmm a Holly leaf, but nothing else. Then I thought, "I have a SEVERAL leaf rubber stamps!" So I found one I thought would do the trick, rounded up the chickens (that's code word for my girls) and got started with my first attempt at PIE STAMPING!

I buy the pre-made pie crust thats comes in a roll. Unroll onto a pie pan and cut the extra dough off the sides. Then roll out the extra dough and stamp-stamp-stamp!

We cut out the leaves with a butter knife. A totally easy and kid friendly project. The leaves were simply pinched onto the dough in the pan and layered around overlapping each other.
Ready for the oven!!!
I always use a pie crust shield to prevent over-browning, but maybe next time I should also brush them with an egg wash? The leaves certainly lost a lot of detail in the baking process, but the pie was mmm, mmm, good and we had FUN doing it! Smileys

Tuesday, November 11, 2008

The Scallop Album

This sweet little album was inspired by Jan Tinks "Carousel Notes Purse." I wanted to make something a little less labor intensive and came up with this simple little album, very easy!

I'm sure you can guess it's made using Stampin' Up!s
Carousel Notes. They come in packs of 30 and the scalloped circles in 3 colors. Ruby Red, Baja Breeze, and Kiwi Kiss with Chocolate Chip envelopes.

I simply built the book around an envelope and utilized a scalloped circle note to create the cover and a pullout on the inside. Adding an extra page inside was easy. I just cut some textured card stock to 6 x 8", scored it square and tucked the extra inside the envelope "pocket." Attach with double sided tape, and embellish with more paper!


Ink: Whisper White, Baja Breeze, & Basic Gray
Stamps: Brocade Basics (109411), Bella Toile (111598)

Paper:
Ski Slope Designer Series Paper (112994), 12x12 Chocolate Chip textured paper (108697), Carousel Notes - Ruby Red, Baja Breeze, Chocolate Chip envelope (112139)
Accessories:
1/16" Circle Punch (101227), Scallop Edge Punch (112091), Scallop Circle Punch (109043), Riding Hood Red Striped Grosgrain Ribbon (111374), Baja Breeze Double Stitched Grosgrain Ribbon (111847), Silver Eyelet (105319), Stampin' Dimensionals (104430)

Thursday, October 23, 2008

Changes Around the House

I have to admit after Stampin Up! introduced Décor Elements, I purchased the Live Every Moment phrase to put on my wall....and I have yet to do it! I wish I could share a photo with you, but I've been obsessive compulsive about putting it up. I think I want to put it over the mantle in the family room, or maybe in Sydney and Natalie's room...or maybe in the studio. Oh geeze, see what I mean!? Free Smiley Courtesy of www.millan.net

Have you seen
Décor Elements yet? They are pretty cool actually. They are self-adhesive vinyl art. The brochure has alphabet letters and LOTS of beautiful sentiments and other fun things you can inexpensively and easily apply to a wall or whatever you want! No messy painting to add a decorative border or a name, and you can remove and replace them on a whim...which means they are especially great for holiday decorating!

Something NEW and only available the rest of this month is the Spooky Spider. Have you seen it? Check out this flyer (CLICK HERE)! Isn't it cute!? I picked up a candy jar just like the one in the flyer at WalMart for about $7 and used the small spider instead of the large one. This was so simple and EASY to do!


There was what I call a WOW project at convention using the
Décor Elements. It was a beautiful shadow box using Season of Thanks. The original version had neutral paper in the background, and some simple Fall leaves behind the glass.

I made my version with a 12x16" rustic style shadow box. I found it at Hobby Lobby for 50% off, so it was only about 10 bucks! I adhered two patterned papers, some ribbon and extra goodies besides just Fall leaves, also from Hobby Lobby. I used
Season of Thanks (114883) in the small chocolate version, but it also comes in a bigger size and in two additional colors. The papers are from Bella Rose and Maine Blueberry with So Saffron Polytwill. For the Fall Foliage, I just cut off what I wanted, arranged them over the backboard and used my hot glue gun in a few key places before sealing it up.

Click
HERE to download a copy of the Décor Elements brochure. It is also available on the right with numerous other mini catalogs.

As a demonstrator I'd love to give you a hostess party using the Décor Elements. Contact me if you'd like to earn FREE products! You can also order right from my website at sally.stampinup.net To learn more about Décor Elements visit THIS PAGE!

Saturday, October 18, 2008

It's a Virtual Thing!

Have you heard about VSBN on Splitcoast? It stands for Virtual Scrapbooking Night.
Free Smiley Courtesy of www.millan.net
What can you expect to see during VSBN?
Lots of challenges, friends chatting and uploading pages to the SCS gallery. But the best part is seeing your pile of pictures getting smaller! ;)
This is the MVP challenge, Most Valuable Product! The challenge is to use something you've been hoarding on a layout...and use this sketch of course!
Free Smiley Courtesy of www.millan.net
The first thing I thought of was last years Halloween paper...man I love that stuff! I have THREE sheets of my favorite pattern and I only used a tiny bit to cover chipboard letters (another thing I tend to hoard) and two clear buttons! So I guess I'm still hoarding it! LOL!!!

Stampin' Up! products used:

Elegant Eggplant Craft ink
Stamps:
Upsy Daisy, Best Friends Alpha Lower
Paper: Halloween Night DSP (2007), Whisper White 12x12 card stock (I dredged ink across the edges since I didn't have any Elegant Eggplant paper), Old Olive card stock, Pale Plum card stock
Accessories: Accents & Elements - Sweet Nothings (I'll never use all this up!)
, Scallop Edge Punch, Clear Buttons, 2 Way Glue

Chipboard letters by K&Company

Thursday, October 16, 2008

Sketch Time Again!


I had a sickly girl here at home with me today, and in between cuddling with books there were a few naps and I actually managed to scrap a little. This is the sketch I used, one of my own that I came up with over the Summer...hmmmm, no one was sick during the Summer!?

Stampin' Up! stamps: Best Yet, Best Friends Alpha Lower "}"
Paper: Windsor Knot Designer Series Paper (I'm really loving this stuff!)
Ink: Chocolate Chip Craft pad and Marker
Accessories: Styled Vanilla Hodgepodge Hardware, Chocolate Grosgrain Ribbon, White Gel Pen, Designer Label Punch

Wednesday, October 15, 2008

Spooky Page


This is a SUPER simple layout I whipped up. I wanted to do a silhouette of a "haunted house" and I had these pictures from dressing up at school last year. The orange piece is a 6x6 sized up into this 12x12 layout.

Stampin' Up! products:

Stamps: Eat Drink & be Scary, Well Worn Alpha
Paper: YoYo Yellow, Basic Black, Perfect Plum, Whisper White, Pumpkin Pie (textured)
Ink: Basic Black (Classic), Elegant Eggplant (Craft)
Accessories: Eggplant grosgrain ribbon, Photo Corner punch, Tag punch (small and reg), craft knife, white gel pen

Thursday, October 9, 2008

FIVE For $5 Stamp a Stack


The Collection

My next workshop is a Stamp-a-Stack. I decided to make five card varieties, and here they are...


Card one:
Riding Hood Red,
Chocolate Chip, and
Whisper White card stock
Holiday Treasures Designer Series Paper
Assorted circle punches, Gold pigment ink, VersaMarker, and gold embossing powder
Sentiment from "All Holidays"


Card two:

Baja Breeze, Whisper White, and
Not Quite Navy card stock
"Season of Joy" stamp set, Baja Breeze Classic ink, Not Quite Navy marker
Technique - I inked the whole stamp with Baja Breeze then darkened a few words with a marker


Card three:
"Whimsey" jumbo wheel
"Heard From the Heart" stamp set

Old Olive marker, Real Red Classic ink
Whisper White, Real Red, and Old Olive card stock


Card four:
"Season of Joy" stamp set
Old Olive Classic ink
Old Olive, Whisper White, Chocolate Chip card stock
Holiday Treasures Designer Series Paper
Corner rounder, chocolate grosgrain ribbon


Card FIVE:

"Big on Christmas" stamp set
Sizzix Sizzlits "Snowflakes Set #2"
Riding Hood Red 5/8" striped grosgrain ribbon
Stampin' Glitter "Dazzling Diamonds"
2 Way Glue, StazOn, Aquapainter
Black, Old Olive, and Lavender Lace markers
Riding Hood Red and Perfect Plum Classic ink
Confetti White, Riding Hood Red, and Perfect Plum card stock
Technique - Watercoloring and omitting with markers. I used a marker to ink up just the part of a stamp I wanted to create the snowflake background. This stamp is from "Season of Joy."

The workshop:
Saturday 10/11/08
9:00 am

or join me in November:
Saturday 11/15/08
2:00 pm

CLICK HERE for more details!

Thursday, October 2, 2008

Birthday Benefits


Sally Saenz
sally.stampinup.net
Download the flyer

Tuesday, September 30, 2008

Crop Drop and Roll...

I went to my local monthly crop again last Friday, and somewhere between the chit and the chat I managed to SCRAP! That in itself was somewhat amazing, since my sister came with me! LOL!!!

I printed off 24 of my sketches that I've never used. Isn't that wacky? I almost completed 2 layouts, which is why I couldn't post them sooner. It's hard to be totally prepared at a crop...at least for me it is, so they both required some additional stamping when I got them home.


I did this one first and aside from the "title" and the flourish, it was done at the crop. I added those Monday afternoon.

Stamp Sets: Brocade Basics, Priceless

Paper: Bella Rose DSP, Pink Pirouette; Kiwi Kiss card stock
Ink: Riding Hood Red Classic
Other: A smidge of ribbon, Square Fire Brads, Paper Dasies


These brads are so cool, and you get 80 in four colors (pink, red, pumpkin, yellow) and two sizes for $10.95. Stampin Up! also carries Square Ice (lilac, light blue, turquoise, green) as well as round versions of both!


This layout came together really easy, and I love this DSP. Maine Blueberry...YUM! The Inspired by Nature set has this awesome grass stamp that I knew would be perfect for this page, layered over that the title is stamped with Lovely Letters.


The little dandelion image is from a new set in the 2008 holiday mini. LOVE this set, it's way cute!!! You can download a copy of this catalog simply by clicking on the image on the right! I'm totally looking forward to the next crop...my pictures are piling up!

Wednesday, September 24, 2008

The Art of C.A.S.E.ing

Copy And Share Everything!
I love lots of the samples in the Fall Winter 2008 Stampin' Up! Idea Book & Catalog. One in particular, on page 101, uses the same stamp set I was dying to play with. Upsy Daisy...my favorite stamp set at the moment! ;)
If I were to sketch this card my version follows the sketch to the T. But I used a more contrasting color on top instead of going with a more monotone look.
I found the perfect little scrap to use as the paper strip. Do you have the new scallop border punch? Everytime you punch a scalloped edge on something, you get this skinny little leftover strip. Well since I never throw anything away, I have all my Night of Navy scraps tucked away with my Night of Navy paper. Free Smiley Courtesy of www.millan.net I knew it'd be just right for this card...as soon as I added some faux stitching!!!
For my niece's birthday I CASEd the same card again. This time I made a pink/red version with the Bella Rose paper. The "label" in the center of the card was done with the tag punch. It was pretty easy. I just slipped each side of the paper into the punch from the bottom. Easier than trying to cut straight edges. And then I went around it with a marker to give it a little extra pizazz.

Related Posts with Thumbnails