Showing posts with label Ask Sally. Show all posts

Friday, November 16, 2012

So Much News

Wednesday afternoon Stampin' Up! began announcing a whole slew of stuff that continued throughout the day yesterday...


First we welcome a New item - the Sizzix Texture Boutique. It's a super cute little embossing machine. Comes with 2 folders, 1 Pair of Standard Embossing Pads, and a Mylar Shim. $39.95 (item 132700) There's a limited supply of 4,000 of these available and we've already sold 1,500 since this was announced! Here's a video to see it in action:


On Monday November 19th at midnight the Online Extravaganza begins. We'll have 3 products 20% that day only along with many other items up to 50% off through November 28th. Here's a list of everything on sale for easy reference! To purchase any of these items, simply click [shop now] while on my website, or try this link to my online store.

 
Have you ever seen that little black square in an advertisement that you can scan with your smart phone and be directed to the website or promotional page? Well this is a new take on that technology. It's called Talking Tag. You buy a sheet of them and using the internet personalize them before attaching to a card or gift. Now your pictures really can say a thousand words!You get 10 tags for just $7.95 (item 129723) Here's a "how to video". 


A card-making application iPhone app! Simply Sent is what it's called, I've linked it on my Facebook Page for you to find it easily in the iTunes store! This iPhone app allows you to create an e-card-from a template or completely on your own-and send it via e-mail or post it on Facebook...and it's FREE!!! Compatible with iPhone, iPod touch, and iPad. Requires iOS 5.1 or later. This app is optimized for iPhone 5.


Introducing the new and improved Stampin' Trimmer! Although paper trimmers are a common crafting tool, this trimmer was designed exclusively by paper crafters for paper crafters-and because it was made by Stampin' Up!, you know it's a cut above the rest! My trimmer is slowly losing the measurement markings when I commonly put my fiongers...they're just rubbing off. You won't have that problem with this one, and it has many more wonderful improvements! $29.95 (item 126889) 


Effective November 14, 2012 I can add digital downloads to a customer workshop order. These used to be only available as an online purchase, but as long as I have your email address, you can buy these from me in person when you attend one of my classes or clubs. Totally cool!! :) 

Well that's all for now! lol

~Sally


Friday, May 4, 2012

The BIG List

You should have already seen the list of retiring stamp sets I posted on my Facebook Page. It's quite a long one, and this one is even longer! There are several items discounted up to 60% off at the beginning of the list, and if there is ANYTHING at all you'd like to order, do it ASAP. These items are only available while supplies last. Here's THE LIST. Anything with an "X" in the right side column is already sold out. You can also click on the image at the right to see pictures of everything still available right from my website.

I also want to take a moment to give you some information about our ink pads. You might notice that ALL ink colors are on the retired list, but this isn't because we're launching a whole new set of colors. What's actually happening is something awesome! Stampin' Up! has redesigned the pad portion of your favorite ink pads. They are referred to as "Firm Foam Pads." They will even include labels as seen below that you can place on the end of your pads to identify the colors quickly and easily!


You’re going to love these new Stampin’ Pads; they have many benefits like these listed below:
  • Better ink coverage for your stamps!
  • Light-tap stamping produces flawless images!
  • Pad stays juicier longer, which means better ink pad longevity!
Please note: Five ink colors have undergone formula changes to improve functionality and color stability with the new firm foam pads. These colors are:
Basic Black
Basic Gray
Marina Mist
Perfect Plum
Tempting Turquoise
All five colors of the reformulated inks have been fully tested and approved. While using the new ink formula in the old Stampin’ Pads is fine, it is not recommended that you use the old ink formula in the new firm foam pads.
Here is an excerpt from the SU! Demo site:
"Q: What are some additional features of the new firm foam pads that I can share with my customers?
A: See additional features below:
  • The firm foam is nice and flat and will not become wavy.
  • The firm foam material does not imprint on the stamp images like the felt pad sometimes did. However, because the firm foam material is a foam base material, the stamp image can momentarily leave an imprint on the pad, which can transfer to a second stamped image. By inking your stamp on different areas of the pad or waiting momentarily for the ink to rise back to the top, you can easily avoid this situation.
  • The firm foam material is soft and has a nice bounce to it. It's not hard like the felt is.
  • The ink lay-down (how the ink is absorbed into the card stock) is even, not blotchy, and dries quickly. It has an increased opacity and stamps solid images beautifully."
Please feel free to contact me if you have any questions or concerns. If I can't answer your question I will be glad to follow up with SU! and get the answer!

Visit my website to see the retiring items before they're gone, and place your order! The launch of our new catalog is June 1, 2012!!!

Stampy Hugs,

Sally

Thursday, December 4, 2008

Scrappy Advice for Getting Started

Occasionally I get an email from a reader and recently I've had two with similar questions. They both asked me about beginning scrapbooking, so here is some advice for getting started.

What Do I Need?

Scrapbooking is a wise investment since you are creating something that will last for many generations, but you really don't need to spend a lot of money to get started. I recommend a good paper trimmer, sharp scissors, and a crafters tool kit to begin with. You'll also need paper and double sided tape, both of which should be archival safe. With these items you can create simple "no-frills" pages, but if you'd like to create something more artistically expressive, you'll want to expand your supplies with a few gadgets and some nice embellishments as well.
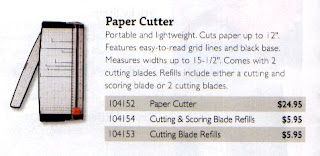
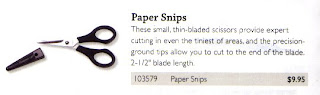
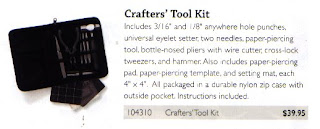
Rubber stamps, and a few ink colors (go for the pigment inks) can add a lot to a scrapbook page. You might also like brads, ribbon, punches, paper flowers...the list can go on and on. Try not to be overwhelmed, buy what you need as you need it to minimize the cost of your new hobby. You could even start with themed "kits" which could make these decisions much easier. Stampin' Up! has a great line of products they call Simply Scrappin' which along with the items pictured above can be purchased through my website.

Believe me, it won't be long before you'll have WAY more consumable supplies than you know what to do with...and you'll wonder how on Earth they've taken over your life!! hee hee

Choose Photos and Color Scheme

Depending on the album size you've chosen, select an appropriate number of photos. Can I get them all on one page or should this be a two page layout? Don't be afraid to trim your photographs and remove excess background. Be conservative, you can always go back and take off more. If you are working with digital photos fix red eye and do most of your cropping BEFORE you print. You can also try printing a few versions of the same photo cropped in different ways. That can be a fun way to use a favorite photo when you don't have additional shots to use with it! Here are two examples of cropping:
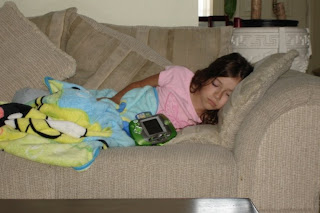
This is my original photo.
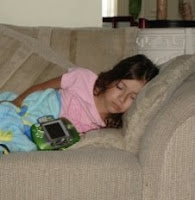
This is how it might look if I simply trimmed some excess and added it to a layout.
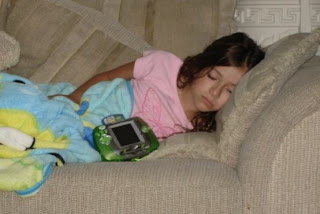
This is the same photo cropped BEFORE printing. If you do this make sure you pay attention to the aspect ratio, I made sure mine was 4x6 and I centered her as much as possible. Notice she is zoomed in closer and you can no longer see the coffee table at the bottom.
It's a better looking version of the original photo, and because I didn't zoom in too close I can still trim more off when I pick up my prints (if I choose to). This would help me squeeze more pictures on a page...which is something I tend to do!

Once all of your photos are cropped to your liking, study them for a similar scheme. Look for similarities in the background colors or the clothing color of the photo's subjects. The best color selection will accent and compliment your photos. To figure out which colors look the best, try laying your photos on a few different colors of card stock. Choose the color that best accents the photograph. Using one color for the background page and another color for matting your photos creates a great looking layout.

Arrange the Layout

Play with the arrangement of your photos until you are pleased with the layout. I like to overlap photos and embellishments sometimes, but I suggest at the very least you keep the photos "clustered" together to enhance the look of your page.You can also follow a sketch, which for some people makes completing pages much easier.

Matting is a simple way to make your photos POP. Matting is done by laying your photos on a piece of card stock 1/8 to ½ inch larger than your photograph. This gives the photos a finished or framed look. For added effect, you can double or triple mats with different colors behind your photos.

Be smart when you cut into patterned paper. Don't toss anything larger than 1/2 an inch. Scraps can make wonderful embellishments that will coordinate with your page. Cover chipboard pieces and use punches...it's just another cost effective way to stretch your supplies!

Choose Embellishments

After selecting and cropping your photos and choosing the background paper, you are ready to select some page decorations. Stamps, die-cuts, punches, brads or eyelets, and paint are all great items to decorate your scrapbook page. Choose embellishments that compliment your photos or the theme of your layout. For instance if your layout consists of birthday pictures, use festive patterned paper or stamp balloons and confetti to make a party theme.

Punches and die-cuts can be purchased in many shapes. I find it a lot of fun to make my own accessories. Try stamping on chipboard, and adding some ribbon and/or hardware. Keep in mind that less is more when using embellishments, the focus should be on your photographs, not on the accessories. Also you should follow "the rule of threes" when possible. Basically place things in odd numbers, 3, 5, 7. It's said to be more visually appealing.
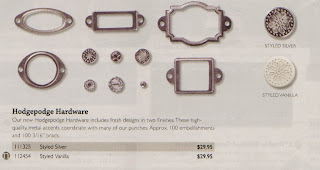
An example of some YUMMY hardware from Stampin' Up!

Don't Forget the Journaling

Journaling is one of the most important parts of a scrapbook. Journaling provides important details about the events or people in your photos. A title is one way to tie the theme of the photos together. When writing about your photos, follow the theme that you chose when you were selecting embellishments.

Add a quote, song lyrics, or the title of the occasion to reflect your page's theme. Add it directly on the page with your rubber stamps or stamp/print your title on coordinating card stock, trim out and attach. Journaling can be handwritten (my preference) or done by using your computer to type it out, just print on acid free paper or card stock.

After giving your page a title, include some information about the people in the photos or details of the events. At the minimum, try to include the name of the person in the photo and the date the photo was taken. Sometimes I limit the date to a month but include the true date on the back of my layout. Once I have several pages for an album that are chronological I don't want them all to include the year....might be a bit redundant.

Arrange the Layout Again and Make it Stick

Before you permanently tape everything down, experiment with the layout. Rearrange the photos and embellishments on the page until you find the best look. I have found myself taking a whole new direction and the end result was a much better page!

Once you are happy with your layout, secure your items to the page. There are several types of adhesives available to scrapbookers including glue, tape, spray adhesive and photo corners. Try using a few different items to see which you like best. Glue sticks work well for die-cuts and other embellishments, securing them firmly to the page. I like my good ole double stick tape!

Put Them Away

I have a little easel on a shelf in my studio and I like to display my pages on it. So when I finish a new layout, I rotate my "new favorite" to the easel. But aside from an easel or a frame, I recommend you keep your finished pages in page protectors ready for an album, or go ahead and put them in an album. Don't stack them on top of each other...additionally you should never store your albums flat, they should be kept upright vertically to prevent bulky embellishments from damaging adjacent pages.

Personally, I like a top loading post bound album. They are easy to rearrange if you need to by just pulling the pages from the protectors and moving them. Since I don't scrap chronologically I have several albums going at the same time. But I wouldn't have it any other way. It allows me to scrap what I'm inspired by at the moment, and since my free time is limited, this is what works best for me!

Tuesday, November 6, 2007

Ask Sally

I recently discovered I actually have readers! So I guess I'm not always talking to myself!!! tee hee Well I decided to share some email correspondence I received (hope that's OK Alison) and feel free to put in your two cents if you have additional advice to share, just post in my comments. Also, if you have a question of your own, email me!

Dear Sally,

I really enjoy your blog and scrapbook layouts. I would really like to start scrapbooking, but feel a little overwhelmed. I never have enough pictures to make an entire book. Sometimes I don't even have enough to make a 2 page by page layout.
I have a friend who just bought a 3 ring binder and when she would ever have one page done she would add it. When you would open the book, the 2 pages had nothing to do with each other. Even if I did start a small book, what is your first page normally about? Does it
have a picture or just something about the theme? I would love it if you had any ideas or suggestions for me.
Thanks,
Alison

Alison,

Wow, thanks for the compliment! I guess one thing you should do is start taking more pictures! *wink*
Well if you know my style, you know I like to use a TON of pictures, but every once in a while, I do a layout with just one. It's a nice change with the right photo. You can even get larger prints and mix it up!
When I have too many pictures for one page and not enough for 2 (or I'm trying to avoid a 3rd page) I sometimes hide some in a little flip out or pull out element. I just did that yesterday with a page as a matter of fact. I folded a strip of patterned paper in thirds and attached it to the page with one picture on top. I put a little folded piece of ribbon at the bottom so you can tell it opens and when you lift the top piece there are two more photos...then you can fold down the inside and you see the journaling. Super easy!

If you do this just cut a slit in the page protector to provide access to the hidden elements! Another thought is to alter the size of your album, you could do a 6x6 or 8x8 instead of 8 1/2 x 11 or 12x12. As far as having pages that compliment each other inside your book, a sure way to accomplish that is to do themed albums. Some people do an album for vacations, one for birthdays, a Christmas album...etc. This is perfect for someone who doesn't want to scrap EVERYTHING. I personally prefer to just scrap chronologically....but I'm on a mission to scrap EVERYTHING! hee hee I was actually in a rut for a long time because I was stuck in the late 90's, but one day I decided to do some current events and I was liberated. I got on a roll that hasn't stopped yet! I have about 5 albums going at the same time, but it helps me stay interested and continue to scrap. Do whatever makes you happy! If I didn't answer this right or I missed something, let me know! You are welcome to call me too. I never get bored of talking about scrapping!

Sally Saenz

Something that I realize now that I did not address is an intro page when you first open the album. I have one book with a page in the cover that conveys what you'll find inside, but I don't usually do a page in the front just to "announce" the rest of the book. It can be frustrating if you find that you want to begin with a DPS, so in that instance an intro page would be appropriate...it could be something as simple as "Saenz Family 2006 - 2007" or if you are doing a themed album, "Christmas with the Saenz' 1995 - 2000" you get the idea!

Here's a few examples of hidden elements:


These were just done Saturday during VSBN, and this is the page I was describing to Alison in my email response. The photo on the upper right of the page has a little loop of ribbon and you can flip it up to see more pictures.
I didn't take another photo of the bottom photo flipped down, but the journaling is under there.

This next page just has a pull out where the journaling is. It probably could have used a little tab of ribbon as well, but if you slit your page protector and leave it sticking out, that should be a clear indicator to give it a tug!

Related Posts with Thumbnails